There are quite a few favorite projects I have completed, the DIY address sign is pretty close to my number one favorite. The outside of your home is the first impression you have when receiving friends and family. This homemade address sign greets them with love and whimsy.

Having clear and modern-looking address numbers was a must for me. I have been looking in my archive for images of the DIY projects I did when I first bought my house.
Coming across my pictures brought back some really fond memories and a BIG smile to my face. My brick bungalow in a favorite suburban hot spot was a real fixer-upper. I am only the second owner of this 1950 gem. The house needed a full remodel of every room! EVERY ROOM! So why not turn to a project that could be done at a later date for some creative distraction.
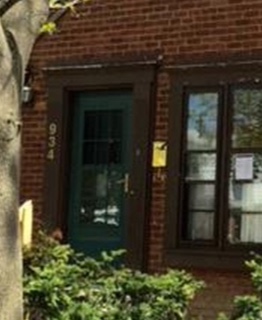
Below is the image that shows the house numbers before. They were gold numbers that were attached directly to the decorative door frame.

I have seen many address number signs that look clean and modern, yet I wanted to add a soft touch to it. I inserted an artificial plant to make the sign have an extra welcoming touch.
The address number sign is now 5 years old and it shows a little wear, but not much. I only needed to purchase a few things and the rest I could upcycle with some loving care. First, you need to gather the items:
Items Needed to create your DIY Address Sign
- a wood board, this could be any size depending on your number and the way you want to look
- house numbers, I used the elevated 5 in. Satin Finish from Home Depot
- black paint, I used Emerald Exterior Latex Acrylic from Sherwin Williams
- polyurethane, this is for after you finish painting the board
- small galvanized steel planter, Socker from IKEA
- Stainless Steel duct clamp
- sandpaper, paint brush
- drill with for adding numbers to sign and masonry screws to secure to your home (if is a brick home)
- artificial plant to add to the planter – pick your favorite style
Then it is time to have some fun and get creative on how you place your numbers.
Special Notes to Consider:
Have loads of fun and post your finished project. This is time-consuming only for the reason of several coats of paint and poly.